Decadent Rich Biscoff Brownies Recipe In 45 Minutes!
Why I Created This Biscoff Brownies Recipe
I’ll never forget the first time I tried Biscoff cookie butter. It was sitting in a friend’s pantry, and I was immediately intrigued by the jar’s label—caramelized, spiced, and spreadable. I took a small spoonful, and my taste buds exploded with warmth and sweetness. It was like eating a cross between a cookie and a rich, buttery caramel, with just a hint of cinnamon and brown sugar. I knew right then that I had to find a way to incorporate this incredible flavor into one of my favorite desserts: brownies. I wanted something that was fudgy, decadent, and just a little bit different from the classic chocolate brownie.
I started experimenting in my kitchen, playing around with ratios of chocolate, butter, and Biscoff cookie butter. The first few attempts were good, but they weren’t quite right—either too cakey, too dry, or lacking that deep, rich flavor I was after. Then, one rainy afternoon, I decided to melt the Biscoff cookie butter with the butter and chocolate, letting the flavors meld together before mixing in the other ingredients. The result was a batter that was smooth, glossy, and packed with that signature Biscoff taste. When I pulled the pan out of the oven, the brownies were perfectly fudgy, with a slight crackle on top and a gooey center. I knew I had nailed it.
This Biscoff brownies recipe has since become a staple in my household. It’s the kind of treat that disappears within hours of baking, whether I’m serving it to friends, bringing it to a potluck, or just enjoying a square (or two) with a cup of coffee. The best part? It’s incredibly easy to make, even if you’re not an experienced baker. If you’ve never tried Biscoff cookie butter before, this recipe is the perfect introduction. And if you’re already a fan, get ready to fall in love all over again.
—
5 Reasons You’ll Love This Biscoff Brownies Recipe
First, these Biscoff brownies are the ultimate combination of rich, fudgy texture and deep, caramelized flavor. The Biscoff cookie butter adds a unique warmth and sweetness that you just can’t get from regular brownies. It’s like taking a classic dessert and giving it a delicious upgrade. The chocolate and Biscoff flavors complement each other perfectly, creating a brownie that’s indulgent without being overly sweet. If you’re a fan of complex, layered flavors, this Biscoff brownies recipe is a must-try.
Second, this recipe is incredibly easy to make, even if you’re not a baking pro. You don’t need any fancy techniques or special equipment—just a mixing bowl, a whisk, and a baking pan. The steps are straightforward, and the batter comes together in minutes. Plus, the recipe uses simple ingredients that you probably already have in your pantry. Whether you’re baking for a last-minute gathering or just craving something sweet, these easy Biscoff brownies are a great choice.
Third, these brownies are versatile and perfect for any occasion. Need a dessert for a potluck? These Biscoff brownies will be a hit. Want to impress your friends with a homemade treat? This recipe delivers. Craving something sweet to enjoy with your afternoon coffee? A square of these fudgy Biscoff brownies is just the thing. They’re also great for gifting—just wrap them up in a pretty box or bag, and you’ve got a thoughtful, homemade present for someone special.
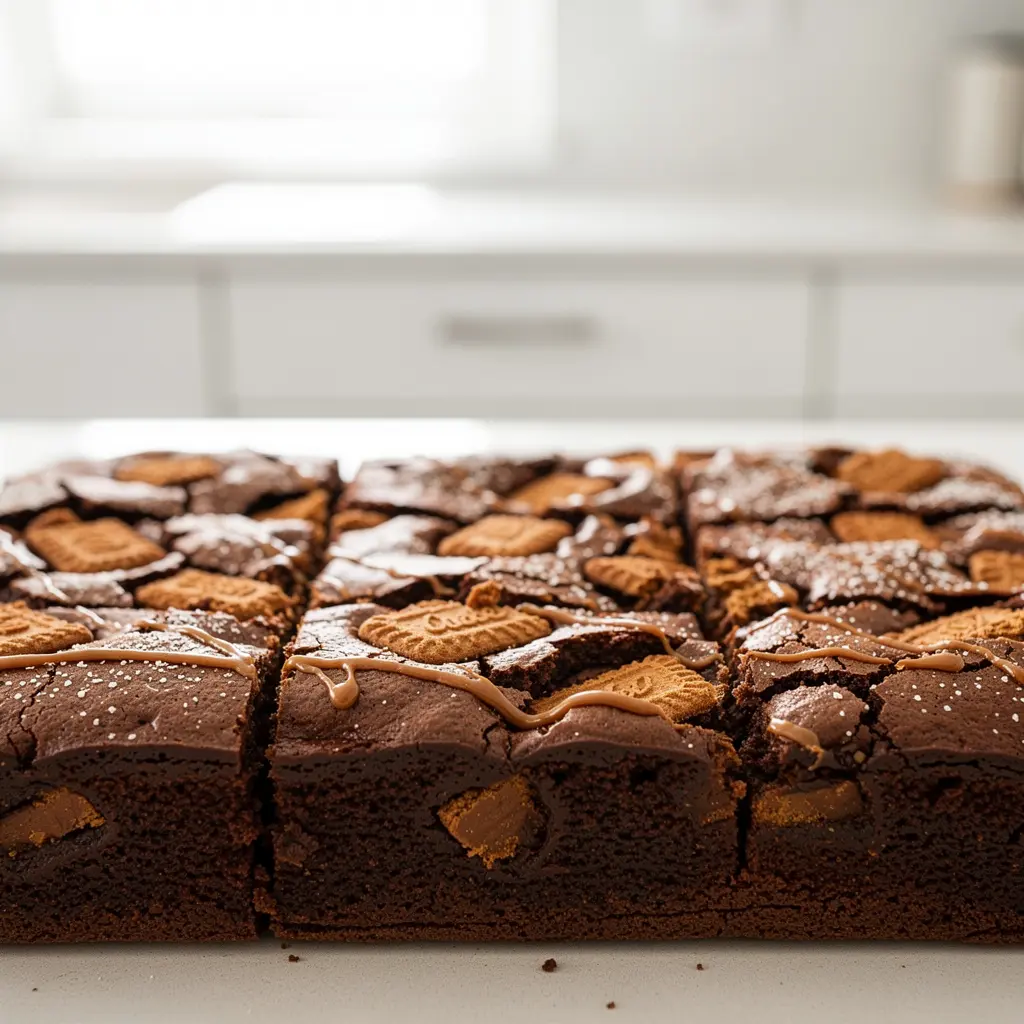
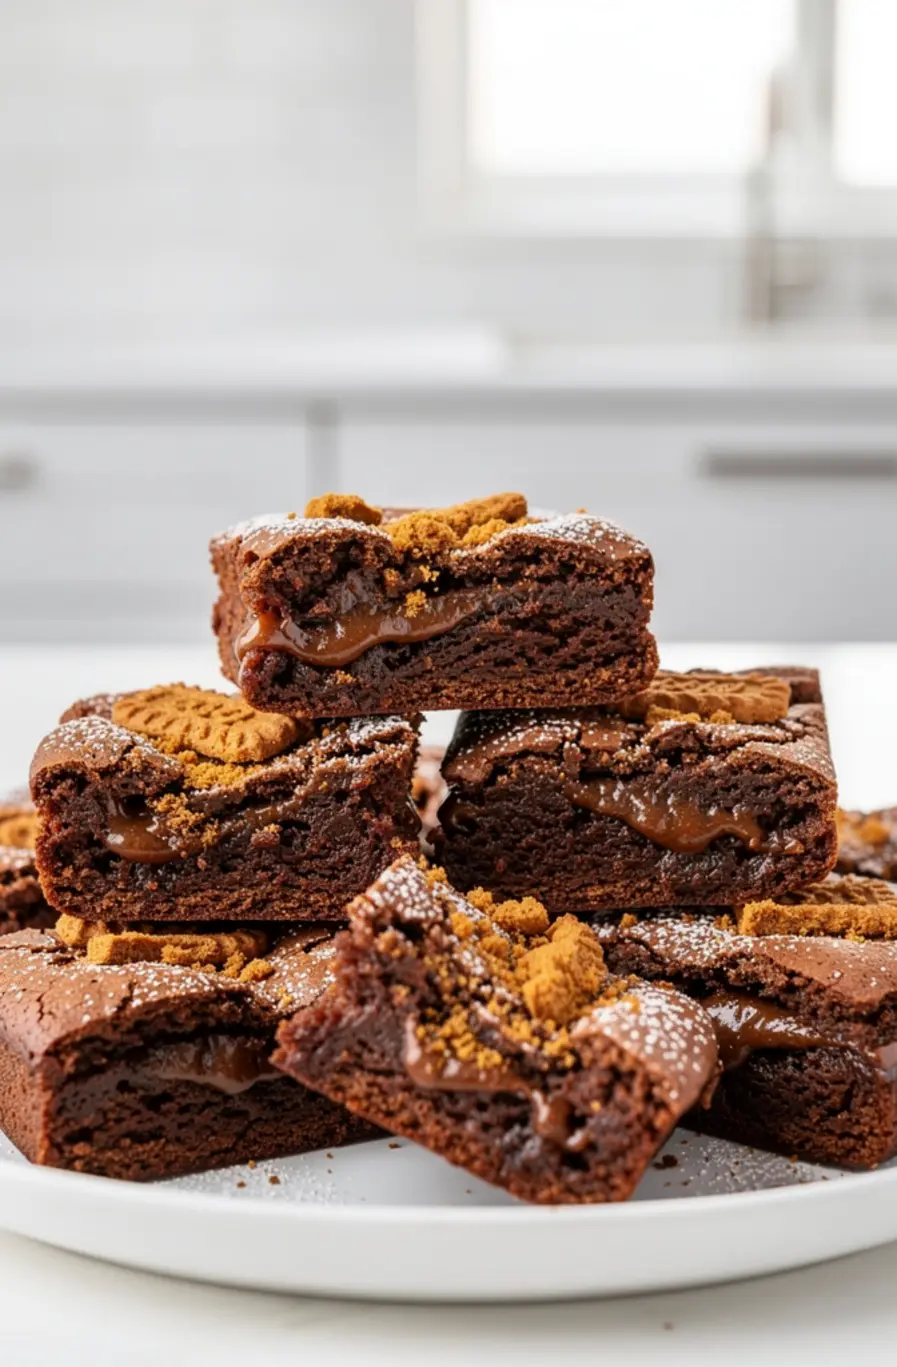
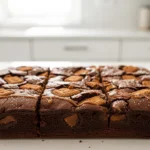
Fourth, the texture of these Biscoff brownies is absolutely divine. They’re dense and fudgy, with a slight crackle on top and a gooey center that melts in your mouth. The Biscoff cookie butter adds a subtle chewiness, while the chocolate keeps them rich and decadent. If you love brownies that are moist and tender, this homemade Biscoff treats recipe is for you. And if you prefer them a little underbaked for extra gooeyness, you can easily adjust the baking time to suit your taste.
Fifth, this Biscoff brownies recipe is endlessly customizable. While the base recipe is already amazing, you can easily tweak it to make it your own. Add a swirl of Nutella for a chocolate-hazelnut twist, sprinkle some sea salt on top for a sweet-salty contrast, or mix in chopped Biscoff cookies for added crunch. The possibilities are endless, and each variation brings something new and exciting to the table. Whether you stick to the original or get creative, these cookie butter brownies are sure to become a favorite.
—
Ingredients for Biscoff Brownies Recipe
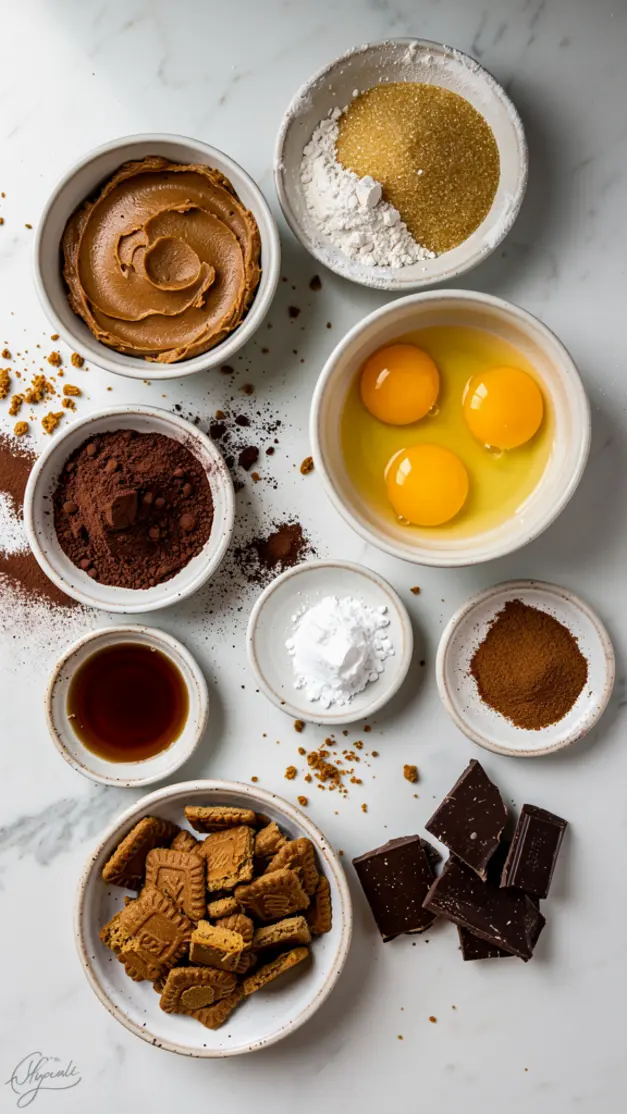
1 cup all-purpose flour
½ cup unsweetened cocoa powder
½ teaspoon salt
½ teaspoon baking powder
1 cup unsalted butter
1 ½ cups granulated sugar
4 large eggs
1 teaspoon vanilla extract
½ cup Biscoff cookie butter
1 cup semi-sweet chocolate chips
½ cup white chocolate chips (optional)
½ cup chopped Biscoff cookies (optional, for texture)
—
Tools You Need to Make Biscoff Brownies Recipe
9×13-inch baking pan
Parchment paper
Large mixing bowl
Medium mixing bowl
Whisk
Rubber spatula
Saucepan (for melting butter and chocolate)
Measuring cups and spoons
Cooling rack
—
How to Make Biscoff Brownies Recipe Step by Step
Preheat the Oven and Prepare the Pan
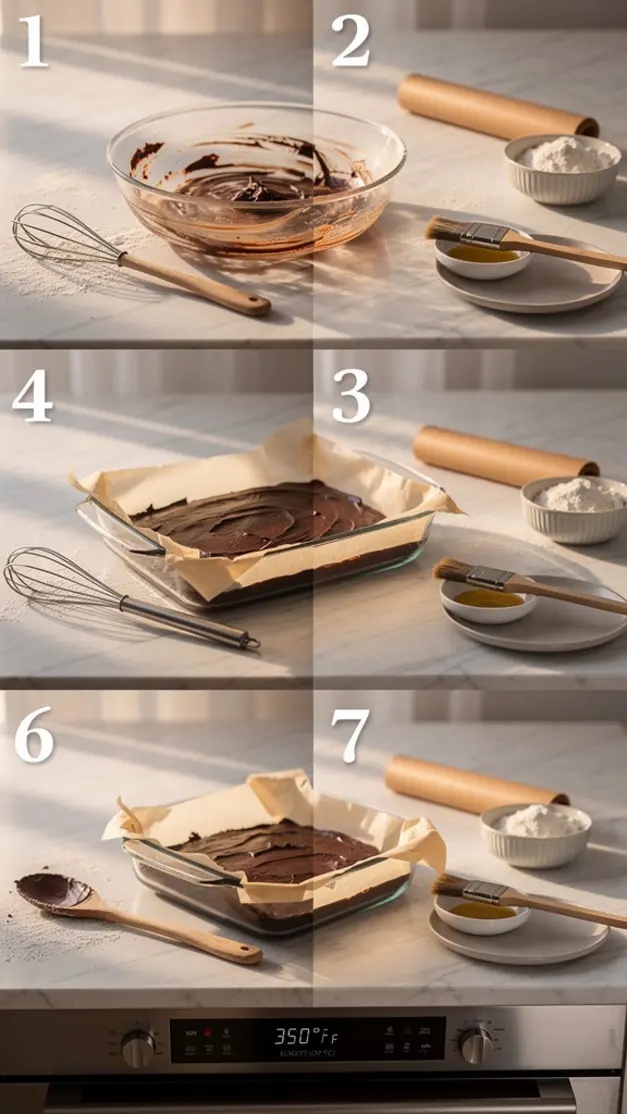
Before you start mixing anything, preheat your oven to 350°F (175°C). This ensures that your oven is at the right temperature by the time your batter is ready to go in. While the oven is heating up, line your 9×13-inch baking pan with parchment paper. I like to leave a little overhang on the sides so I can easily lift the brownies out of the pan once they’re baked. If you don’t have parchment paper, you can grease the pan with butter or cooking spray, but parchment makes cleanup a breeze and helps prevent the brownies from sticking.
If you’re adding any optional mix-ins, like chopped Biscoff cookies or white chocolate chips, set them aside now so they’re ready to go when you need them. Having everything prepped and within reach will make the process smoother and more enjoyable. Trust me, there’s nothing worse than scrambling to chop cookies while your batter is waiting!
Mix the Dry Ingredients
In a medium mixing bowl, whisk together the flour, cocoa powder, salt, and baking powder. This step is important because it ensures that all the dry ingredients are evenly distributed, which helps create a uniform texture in your brownies. If you skip this step, you might end up with pockets of salt or baking powder in your brownies, and nobody wants that!
Once your dry ingredients are mixed, set the bowl aside. You’ll come back to it later when you’re ready to combine everything. I like to give the bowl a little tap on the counter to settle the ingredients, just to make sure nothing flies out when I’m whisking. It’s a small step, but it makes a difference in keeping your kitchen clean and your ingredients where they belong.
Melt the Butter, Chocolate, and Biscoff Cookie Butter
In a saucepan over low heat, melt the butter, Biscoff cookie butter, and semi-sweet chocolate chips together. Stir constantly to prevent the mixture from burning or sticking to the bottom of the pan. The goal here is to create a smooth, glossy mixture where all the ingredients are fully melted and combined. This step is key to achieving that rich, fudgy texture in your brownies, so take your time and be patient.
Once everything is melted, remove the saucepan from the heat and let the mixture cool slightly. You don’t want it to be too hot when you add it to the eggs, or you might end up with scrambled eggs in your batter (and nobody wants that!). A good rule of thumb is to let it cool for about 5 minutes, or until it’s just warm to the touch. While it’s cooling, you can move on to the next step.
Whisk the Sugar and Eggs
In a large mixing bowl, whisk together the sugar and eggs until the mixture is light and slightly frothy. This step is important because it helps incorporate air into the batter, which contributes to the brownies’ texture. You don’t need to whisk for too long—just until the sugar is fully dissolved and the eggs are well combined. If you’re using a stand mixer or hand mixer, you can use that to make this step even easier.
Once the sugar and eggs are combined, add the vanilla extract and mix it in. The vanilla adds a subtle depth of flavor that complements the chocolate and Biscoff beautifully. If you’re feeling fancy, you can use a high-quality vanilla extract or even a vanilla bean paste for an extra-special touch. Either way, this step is quick and simple, but it makes a big difference in the final result.
Combine the Wet and Dry Ingredients
Now it’s time to bring everything together. Pour the slightly cooled butter-chocolate-Biscoff mixture into the bowl with the sugar and eggs. Use a rubber spatula to gently fold everything together until just combined. Be careful not to overmix at this stage—you want to keep as much air in the batter as possible to ensure your brownies turn out tender and fudgy.
Once the wet ingredients are combined, add the dry ingredients you mixed earlier. Gently fold them into the batter until just incorporated. Again, be careful not to overmix. The batter will be thick and glossy, which is exactly what you want. If you’re adding any optional mix-ins, like white chocolate chips or chopped Biscoff cookies, fold them in now. This is also the time to add a swirl of Nutella or a sprinkle of sea salt if you’re feeling creative.
Bake the Brownies
Pour the batter into your prepared baking pan and spread it out evenly with a spatula. If you’re adding any toppings, like extra chocolate chips or a sprinkle of sea salt, now’s the time to do it. Pop the pan into the preheated oven and bake for 25-30 minutes, or until a toothpick inserted into the center comes out with a few moist crumbs. Remember, brownies continue to cook a little as they cool, so it’s better to slightly underbake them than to overbake.
While the brownies are baking, resist the urge to open the oven door too often. Every time you open the door, you let out heat, which can affect the baking time and texture of your brownies. Instead, set a timer and check on them only when necessary. Once they’re done, remove the pan from the oven and let the brownies cool completely in the pan before slicing. This step is crucial—if you try to slice them while they’re still warm, they’ll crumble and fall apart.
Cool and Slice the Brownies
Once the brownies are out of the oven, let them cool in the pan for at least 15 minutes. This allows them to set slightly, making them easier to lift out of the pan. After 15 minutes, use the parchment paper overhang to lift the brownies out of the pan and transfer them to a cooling rack. Let them cool completely before slicing—this can take up to an hour, but it’s worth the wait.
When the brownies are fully cooled, use a sharp knife to slice them into squares. For clean, even cuts, wipe the knife with a damp cloth between each slice. If you’re serving them right away, arrange them on a platter or in a pretty box. If you’re saving them for later, store them in an airtight container at room temperature. These Biscoff brownies are so delicious that they probably won’t last long, but if they do, they’ll keep well for several days.
—
My Pro Tips for the Best Biscoff Brownies Recipe
One of the most important tips I can give you for making the best Biscoff brownies is to use room temperature ingredients. This might seem like a small detail, but it makes a big difference in the texture of your brownies. When your eggs, butter, and Biscoff cookie butter are at room temperature, they blend together more smoothly, creating a batter that’s silky and uniform. If your ingredients are cold, they won’t incorporate as easily, and you might end up with a lumpy or uneven batter. To bring your eggs to room temperature quickly, place them in a bowl of warm water for about 10 minutes before you start baking.
Another pro tip is to line your baking pan with parchment paper. This might seem like an extra step, but it’s worth it for a couple of reasons. First, parchment paper makes it easy to lift the brownies out of the pan once they’re baked, so you don’t have to worry about them sticking or breaking apart. Second, it makes cleanup a breeze—just lift the brownies out, and you’re done! If you don’t have parchment paper, you can grease the pan with butter or cooking spray, but parchment is definitely the way to go if you want to make your life easier.
If you love gooey, fudgy brownies, slightly underbake them by 1-2 minutes. Brownies continue to cook a little as they cool, so if you take them out of the oven when they’re just set, they’ll be perfectly gooey by the time they’re cool. To check if they’re done, insert a toothpick into the center—if it comes out with a few moist crumbs, they’re ready. If it comes out clean, they’re overbaked, and if it comes out with wet batter, they need a little more time. Trust me, this small adjustment makes a big difference in the final texture of your Biscoff brownies.
Let the brownies cool completely before slicing. I know it’s tempting to dig in as soon as they’re out of the oven, but patience is key here. If you try to slice them while they’re still warm, they’ll crumble and fall apart, and nobody wants that. Letting them cool allows the brownies to set, so you get clean, even slices every time. If you’re in a hurry, you can speed up the cooling process by placing the pan in the fridge for about 20 minutes, but I prefer to let them cool at room temperature for the best texture.
Finally, don’t be afraid to get creative with your Biscoff brownies. While the base recipe is already amazing, there are so many ways to customize it to suit your taste. Try adding a swirl of Nutella for a chocolate-hazelnut twist, or sprinkle some sea salt on top for a sweet-salty contrast. You can also mix in chopped Biscoff cookies for added texture, or even fold in some white chocolate chips for a little extra sweetness. The possibilities are endless, so have fun experimenting and making this Biscoff brownies recipe your own.
—
Delicious Variations of Biscoff Brownies Recipe
One of my favorite variations of this Biscoff brownies recipe is to add a swirl of Nutella. To do this, simply spread a layer of Nutella over the brownie batter before baking, then use a knife to swirl it into the batter. The Nutella adds a rich, chocolate-hazelnut flavor that pairs beautifully with the Biscoff cookie butter. It’s like having a little surprise in every bite! If you’re a fan of Nutella, this variation is a must-try.
Another delicious variation is to sprinkle a little sea salt on top of the brownies before baking. The sea salt enhances the sweetness of the chocolate and Biscoff, creating a perfect balance of flavors. It’s a simple addition, but it makes a big difference in the final result. If you love the sweet-salty combo, this is the variation for you. Just be sure to use a light hand when sprinkling the salt—you don’t want to overpower the other flavors.
For added texture, try mixing in chopped Biscoff cookies or white chocolate chips. The chopped cookies add a nice crunch, while the white chocolate chips bring a little extra sweetness. You can also fold in both for a double dose of deliciousness. This variation is perfect if you love brownies with a little something extra. Just be sure to chop the cookies into small pieces so they distribute evenly throughout the batter.
—
What to Serve With Biscoff Brownies Recipe
These Biscoff brownies are delicious on their own, but they’re even better when paired with the right accompaniments. One of my favorite ways to serve them is with a scoop of vanilla ice cream. The cold, creamy ice cream contrasts beautifully with the warm, fudgy brownies, creating a dessert that’s pure indulgence. You can also drizzle a little caramel sauce or chocolate syrup over the top for an extra-special touch. If you’re serving these brownies at a party, consider setting up a dessert bar with different toppings so everyone can customize their own.
Another great way to serve these Biscoff brownies is with a hot cup of coffee or tea. The rich, chocolatey flavor of the brownies pairs perfectly with the bold, slightly bitter notes of coffee, while the warmth of the tea brings out the caramelized sweetness of the Biscoff. If you’re serving them for breakfast (because why not?), try pairing them with a cold glass of milk. The milk helps balance the richness of the brownies, making them the perfect morning treat. No matter how you serve them, these easy Biscoff brownies are sure to be a hit.
—
How to Store Leftover Biscoff Brownies Recipe
If you somehow manage to have leftovers, storing these Biscoff brownies is a breeze. The best way to keep them fresh is to store them in an airtight container at room temperature. They’ll stay moist and delicious for up to 5 days, making them a great make-ahead treat. If you live in a humid climate, you might want to store them in the fridge to prevent them from becoming too soft. Just be sure to let them come to room temperature before serving for the best texture.
If you want to keep your brownies fresh for even longer, you can freeze them. To do this, wrap the brownies tightly in plastic wrap or aluminum foil, then place them in a freezer-safe bag or container. They’ll keep in the freezer for up to 3 months. When you’re ready to enjoy them, let them thaw at room temperature for a few hours, or pop them in the microwave for a few seconds to warm them up. Freezing is a great option if you want to make a big batch and save some for later.
If you prefer your brownies warm, you can reheat them in the microwave for about 10-15 seconds. This will soften them slightly and bring out the rich, chocolatey flavor. Just be careful not to overheat them, or they might become too soft. You can also reheat them in the oven at 300°F (150°C) for about 5-10 minutes. This method is great if you want to warm up a whole batch at once.
—
Frequently Asked Questions About Biscoff Brownies Recipe
Can I use a different type of cookie butter in this Biscoff brownies recipe?
While Biscoff cookie butter is the star of this recipe, you can experiment with other types of cookie butter if you’d like. Peanut butter or almond butter would work well, but keep in mind that they’ll give the brownies a different flavor. If you do use a different type of cookie butter, you might need to adjust the sugar or other ingredients to balance the flavors. That said, I highly recommend sticking with Biscoff for the best results—it’s what makes these brownies so special!
Can I make these Biscoff brownies gluten-free?
Yes! To make this Biscoff brownies recipe gluten-free, you can substitute the all-purpose flour with a 1:1 gluten-free baking flour. Just be sure to check the labels on your other ingredients, like the Biscoff cookie butter and chocolate chips, to make sure they’re gluten-free as well. The texture might be slightly different, but the brownies will still be delicious. If you’re baking for someone with gluten sensitivities, this is a great way to make sure everyone can enjoy them.
Why did my brownies turn out cakey instead of fudgy?
If your brownies turned out cakey instead of fudgy, it’s likely because the batter was overmixed or the baking powder was too strong. To avoid this, be sure to mix the batter just until the ingredients are combined—overmixing can incorporate too much air, leading to a cakey texture. Additionally, make sure you’re using the correct amount of baking powder. Too much can cause the brownies to rise too much, resulting in a lighter, cake-like texture. If you prefer fudgy brownies, you can also try reducing the baking powder slightly or omitting it altogether.
Can I double this Biscoff brownies recipe?
Yes, you can double this Biscoff brownies recipe if you need to make a larger batch. Just be sure to use a bigger baking pan or divide the batter between two 9×13-inch pans. Keep in mind that doubling the recipe might require a slightly longer baking time, so keep an eye on them and check for doneness with a toothpick. If you’re baking in two pans, you might need to rotate them halfway through to ensure even baking. Doubling the recipe is a great option if you’re baking for a crowd or want to have extra brownies on hand.
Can I add nuts to this Biscoff brownies recipe?
Absolutely! If you love the crunch of nuts in your brownies, feel free to add them to this recipe. Walnuts, pecans, or almonds would all work well. Just chop them into small pieces and fold them into the batter before baking. You can also sprinkle a few on top for added texture. If you’re adding nuts, you might want to toast them first to bring out their flavor. Just spread them on a baking sheet and bake at 350°F (175°C) for about 5-10 minutes, or until fragrant.
How do I know when the brownies are done?
The best way to tell if your Biscoff brownies are done is to insert a toothpick into the center. If it comes out with a few moist crumbs, they’re ready. If it comes out clean, they’re overbaked, and if it comes out with wet batter, they need a little more time. Keep in mind that brownies continue to cook a little as they cool, so it’s better to slightly underbake them than to overbake. If you’re unsure, you can also gently press the top of the brownies—if they spring back slightly, they’re done.
—
The Story Behind My Biscoff Brownies Recipe
I’ve always been a brownie lover. There’s something about the rich, chocolatey flavor and fudgy texture that just hits the spot every time. But after trying Biscoff cookie butter for the first time, I knew I had to find a way to incorporate it into my favorite dessert. I wanted to create a brownie that was still deeply chocolatey but with that unique, caramelized sweetness that makes Biscoff so special. I spent weeks experimenting with different ratios of chocolate, butter, and Biscoff cookie butter, tweaking the recipe until I landed on the perfect balance of flavors and textures.
The first time I made these Biscoff brownies, I knew I had something special. The aroma of melted chocolate and Biscoff filled my kitchen, and the batter was so rich and glossy that I could barely resist licking the spoon. When I pulled the pan out of the oven, the brownies were perfectly fudgy, with a slight crackle on top and a gooey center. I let them cool (barely!) before slicing into them, and the first bite was pure magic. The chocolate was deep and decadent, the Biscoff added a warm, spiced sweetness, and the texture was exactly what I had been aiming for—dense, moist, and utterly irresistible. Since then, this Biscoff brownies recipe has become a staple in my household, and I’m so excited to share it with you.
—
Pin This Biscoff Brownies Recipe For Later
I hope you love this Biscoff brownies recipe as much as I do! Whether you’re baking for a special occasion or just treating yourself to something sweet, these brownies are sure to impress. The combination of rich chocolate and caramelized Biscoff cookie butter is simply irresistible, and the fudgy texture makes them the ultimate comfort food. Don’t forget to save this recipe for later—you’ll want to make it again and again. Happy baking!
Biscoff Brownies Recipe
Ingredients
- 1 cup unsalted butter
- 1 cup granulated sugar
- 3/4 cup packed light brown sugar
- 4 large eggs
- 1 teaspoon vanilla extract
- 1/2 cup Biscoff cookie butter (smooth)
- 1 cup all-purpose flour
- 1/2 cup unsweetened cocoa powder
- 1/2 teaspoon salt
- 1/2 teaspoon baking powder
- 1/2 cup semi-sweet chocolate chips
- 1/4 cup chopped Biscoff cookies (optional)
Instructions
- Preheat your oven to 350°F (175°C) and line an 8x8-inch baking pan with parchment paper, leaving an overhang on the sides for easy removal. Grease the parchment paper lightly with butter or non-stick spray.
- In a medium saucepan, melt the unsalted butter over low heat. Once melted, remove from heat and stir in the granulated sugar and light brown sugar until fully combined and smooth. Let the mixture cool slightly for about 5 minutes.
- Whisk in the eggs, one at a time, ensuring each egg is fully incorporated before adding the next. Stir in the vanilla extract and Biscoff cookie butter until the mixture is smooth and well combined.
- In a separate bowl, sift together the all-purpose flour, unsweetened cocoa powder, salt, and baking powder. Gradually add the dry ingredients to the wet mixture, stirring just until combined and no flour streaks remain. Avoid overmixing.
- Fold in the semi-sweet chocolate chips and chopped Biscoff cookies (if using) until evenly distributed throughout the batter.
- Pour the batter into the prepared baking pan and spread it evenly with a spatula. Tap the pan gently on the counter a few times to remove any air bubbles.
- Bake in the preheated oven for 25-30 minutes, or until a toothpick inserted into the center comes out with a few moist crumbs (but not wet batter). Avoid overbaking to keep the brownies fudgy.
- Allow the brownies to cool completely in the pan on a wire rack, about 1 hour. Once cooled, use the parchment paper overhang to lift the brownies out of the pan and place them on a cutting board. Slice into 9 equal squares and serve.